Frequently Asked Questions
If you want to know more about our products and our support, the FAQs are a great place to begin. Here, you’ll see some popular questions as well as detailed answers. This is a great place to familiarize yourself with Matrix and how we can help you.
- How do I set up my DVR network?
- How do I determine the networking bandwidth requirements for my DVR?
- What are the optimal recording settings for my DVR?
- Can the DVR interface with a BA (burglar alarm) system?
- How do I connect a DVR, PTZ and keyboard together in one system?
- What is RASPlus and how do I use it with my DVR?
- Can I connect to my DVR remotely with a Smartphone or tablet?
- Which PTZ protocols are supported by the ADT DVRs?
- What would cause my DVR to go into alarm or beep?
How do I set up my DVR network?
DVR Network Setup Instructions
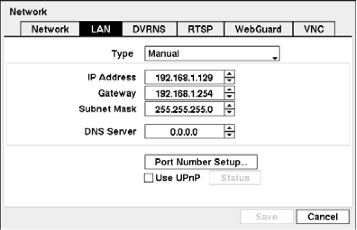
1. Begin with setting up the DVR on the local network. Set up the DVR Network Menu according to the instructions detailed in the Networking chapter of the DVR’s manual. How you setup LAN setup page will depend on what type of network equipment used. In most cases the DVR will be connected to a router.
Manual – Fixed IP (Recommended for most routers). You will need to input the information manually into the DVR. In order for the connection to work, you must enter valid data, compatible with your network, for the first three of the network setting fields: IP address, subnet mask, default gateway. In order to avoid address conflicts it is recommended to assign an IP address outside of the DHCP range of addresses your router issues to DHCP clients.
DHCP – Dynamically changing IP (Not recommended for most routers). The settings will be detected automatically. While DHCP may a useful tool for determining the network settings but if you setup your DVR in this manner its IP address may change from time to times for different reasons. If the IP address of the DVR changes, you may have difficulties accessing your DVR locally and/or remotely.
NOTE: In some cases the DVR also requires a DNS Address. Depending on your network hardware and configuration this may be the same IP address of your router/gateway. In most cases you can obtain the DNS IP from a PC connected on the same network as the DVR.
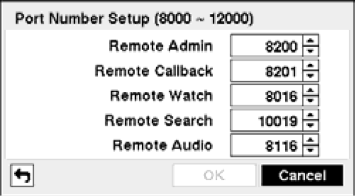
2. If you are connecting through a router, make sure that you have opened or forwarded all the required network ports in the port forwarding section of your router’s setup. That is, you have directed the router to send any incoming traffic using those IP ports to the IP address of the DVR. Instructions for port forwarding, for many types of routers, can be found on the internet at www.portforward.com. The DVR uses several communication ports. The default ports are 8200(admin), 8016(watch), 10019(search) and 12088 (web browser). All are TCP protocol. Other ports may also be needed depending on which additional DVR functions are used. Refer to your DVR manual for further information.
NOTE: Different routers may use different terms for port forwarding function. For instance, Linksys uses the term port forwarding, D-Link uses virtual server and Netopia uses pinholes. Refer to your router manual for further information
3. Determine how the DVR will be located over the Internet. If you are unsure about what type of internet connection you have, contact your Internet Service Provider.
Types of Internet Connections
Static IP – Fixed Internet address. This is obtained from the internet service provider and typical at a premium.
Dynamic IP – Changing internet address. This is the typical type of connection that is provided by an internet service provider. It is recommended to use a third party service locating service or a static IP to provide a reliable connection to the DVR.
NOTE: Third party locating services typically require a network device to report the location of the network back to their server. The server will provide the location of the network typically via a name.
There are many third part services available. Below are some of the commonly used services.
DVRNS – Supported internally by the DVR
2dvr.com – Provides networking support of the DVR and network equipment to the user. ADT DVR’s directly support 2dvr.com services.
dvrnames.net – No network or DVR support provided
DDNS – Requires a network device such as a supported router. Contact the provider of the service to see which routers support their service.
no-ip.com – Limited support of service, requires customer to agree to monthly solicitations and IP address must change every 30-days
tzo.com - Provide technical support of routers that support their service.
http://dyn.com/dns/dyndns-pro - Provides technical support of routers that support their service.
http://free.domain.name/en.html - Provides limited support of service.
www.dvrdns.net – No support provided
4. Remote connection is done through remote software or a supported browser. Refer to the DVR manual for available connection methods.
Where possible ADT tech support will assist with setting up our DVR for a local and off site connection. In order for us to assist in providing support you must have a computer and the DVR connected to the same network device and have access to the internet.
How do I determine the networking bandwidth requirements for my DVR?
The DVR uses different amounts of bandwidth depending on whether you are viewing live or recorded video. These settings will determine the clarity of the image as well as the number of images per second that you see. This will impact the amount of bandwidth used.
Note - Higher Quality and Resolution settings will require higher bandwidth settings. Depending on the network environment, these speeds may not be achieved.
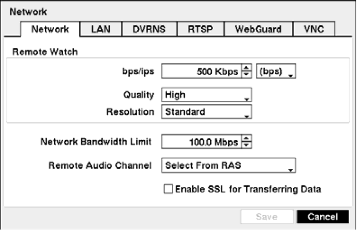
Live – Remote Watch
In the network setup of the DVR there are settings to configure how much bandwidth the DVR will use when watching live video. You can select Quality (Image quality is the amount of digital compression) and Resolution (Image resolution is the number of pixels or dots that make up the image). These settings will affect the clarity of the video and consequently the size of the picture data file. You also have control over BPS (bytes per second) or IPS (images or pictures per second). These two settings have the same overall affect. If you select BPS, it will set the bandwidth and thus control the number of images per second. If you select IPS, it will set the number of pictures per second and thus control the amount of bandwidth. To determine the extent of the influence of these settings on bandwidth you can refer to the bandwidth calculator on the ADT website.
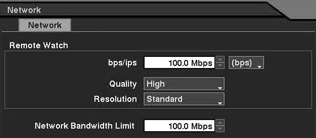
Playback – Network Bandwidth Limit and DVR Setup
The Network Bandwidth Limit is shown in the Network setup of the DVR. This controls the total bandwidth that the DVR can use and thus limits the playback bandwidth. The DVR’s bandwidth is also determined by the recording settings in the Schedule of the DVR. In the Schedule of the DVR, changes to IPS (images or pictures per second), Quality (the amount of digital compression) and Resolution (the number of pixels or dots that make up the image) will influence the amount of bandwidth that the DVR will use when playing back video. To determine the extent of the influence of these setting on bandwidth you can refer to the bandwidth calculator on the ADT website.
What are the optimal recording settings for my DVR?
Unfortunately this question can’t be directly answered since it depends on so many variables. To determine your best settings you need to consider what you are trying to accomplish. Then you need to determine the balance between the following factors:
- Image quality
- Images per second (IPS)
- When it will record
- Length of recording time
- Available storage
Also different settings can be used at different times to further customize the recording. For example, you may want to use continuous recording at a lower image quality during the day and motion recording at a higher image quality at night.
Remember to review the recording made with your settings to determine if you are satisfied with the changes.
To setup the DVR recording settings, go to the Schedule.
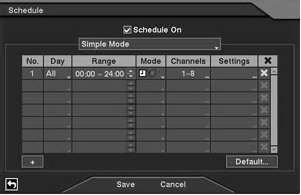
Day – Select which days you want the DVR to record
Range – Select what time of day you want the DVR to record
Mode – Select if you want to use Time (continuous) and /or Event (Motion, alarm-in, video loss, etc)
Channels – Select which cameras you want to record
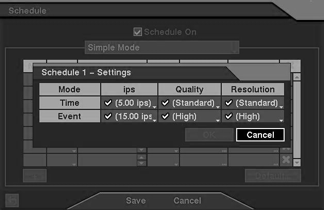
Next, select the Settings field.
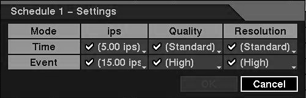
IPS – Select the desired number of pictures (images) per second.
Quality – Select the desired quality of the image.
Resolution – Select the desired resolution of the image.
After making changes, playback the video to determine which level is best for your application.
Once you have decided on your settings, you can use the recording calculator on our website to determine how much recording time you can expect to get. If you are not getting your desired amount of recording time, you may need reconsider your settings or contact our sales department to have more hard drive space installed.
Can the DVR interface with a BA (burglar alarm) system?
Yes, all currently offered ADT DVRs have alarm inputs that can be connected to a burglar alarm system.
Note: Not all burglar alarm systems have an alarm output. Please verify that your burglar alarm hardware has an available alarm output.
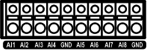
External devices such as Mechanical (Dry Contacts) or electrical (TTL) switches can be wired to the AI (Alarm-In) and GND (Ground) connectors to trigger the DVR.
Dry Contacts in a continuous circuit are commonly used to open or close the circuit. Usually a relay output or push button switch is used.
TTL - The threshold voltage of the electrical input is above 2.4V for an open circuit, below 0.3V for a closed circuit, and should be stable at least 0.5 seconds to be detected. The voltage range of the alarm input is from 0V to 5V.
DVR Setup
Connect wires to the desired alarm input. The alarm inputs are found on the back of the DVR and are labeled as AI.
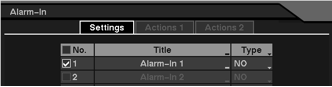
Go into the menu and go to Alarm Input.
Select the desired alarm input.
Select the alarm input as a NC (Normally Closed) or NO (Normally Open) circuit.
Next, go to the Actions screen and setup what you would like the DVR to do upon receiving the alarm in event.
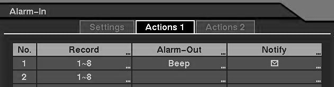
Save your settings.
How do I connect a DVR, PTZ and keyboard together in one system?
The image below shows the wiring diagram when all ADT equipment is used. It was taken from the keyboard manual.

Keyboard Control of the PTZ Cameras
Connect twisted pair wire from the RS-485 connection on the PTZ camera to the Dome 1 connection on the keyboard. When the keyboard is powered up it will locate the connected cameras and you will have control of them.
Keyboard Control of the DVR
Connect an RS-232 null modem cable from the RS-232 port on the DVR to the RS-232 port on the keyboard. (Note: RS-232 cables cannot exceed 50ft.) In the menu of the keyboard, set the RS-232 port to DVR4. In the Remote Control menu of the DVR, set the device type to Remote Control. In the Information menu of the DVR, set the System ID to 1. To start control, press button 1 followed by the DVR button on the keyboard. The DVR control buttons on the keyboard will now function like the buttons on the front of the DVR.
DVR Control of the PTZ Cameras
Connect twisted pair wire from the RS-485 connection on the DVR to the Dome 2 connection on the keyboard. In the keyboard menu, set Dome2 to AUX-IN. In the DVR Camera menu, go to PTZ. Set port to RS-485. In Product, select Fastrax2. In ID, select 1 and save. Bring the camera up full screen on the DVR and press and hold the PTZ button. When prompted, select the PTZ listed. You can now use the DVR buttons to control the camera.
Note: Once the DVR has the ability to control the PTZ, you can also control the camera via the RAS Plus PC software.
What is RASPlus and how do I use it with my DVR?
RASPlus is our latest version of remote access and management software for our DVRs. It has the ability to watch and search video or administer changes to the DVR. The software is available on our website and is also included in the DVR packaging.
Software Setup
After the software has been installed, open the program.
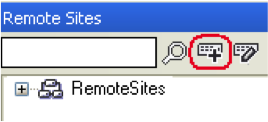
Click on the Add Site icon in the Remote Sites field to open the Add Site screen.
Fill in the fields as needed.
Reference Group – Use this if you are going to have multiple sites and need to organize your sites into specific groups.
Device Setup
- Device – Choose the type of device to which you are going to connect. In most cases this will be a DVR.
Remote Site Setup
Site Name – This is a user-defined field where you will name the site, such as a physical street address or company/residence location.
- IP Address – Enter your DVR IP address.
- Ports – Leave the default settings on, unless it was changed at the DVR.
- Camera – This will automatically be populated when you make your first connection.
- Use DVRNS – Only select if you are using a DVR naming service in place of a static IP, such as 2dvr.com.
- Use Modem – Only select if you are using a dial up connection. None of our current DVRs have this ability.
- PC-Based DVR – Only select this if you are using a PC- based DVR. None of our current DVRs have this ability.
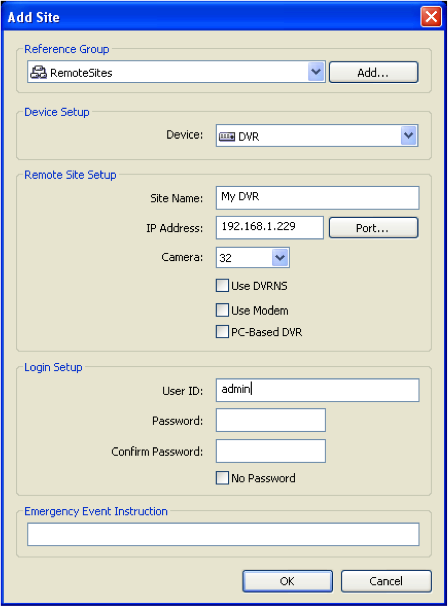
Login Setup
- User ID - Match you DVR user name. The default is admin.
- Password - Match you DVR password. The default is no password.
Click OK to save the site information.
Connecting
Watch / Search
To make the connection - select the site from the remote site list and then drag and drop the site to the Camera 1 location.
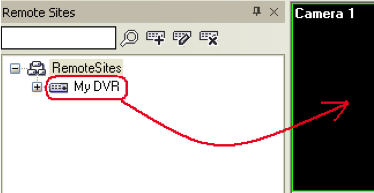
Select Watch Screen to watch the live video from the DVR or select Search Screen to search the video from the DVR.

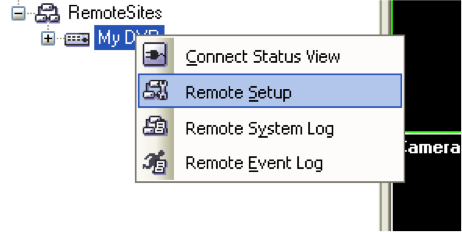
DVR Management
Right click on the site and click on Remote Setup. This will bring up the DVR menu.
For a more comprehensive overview of the program, please refer to the quick reference guide on our website. For a complete description, please refer to the software manual on our website.
Can I connect to my DVR remotely with a Smartphone or tablet?
Yes, our current DVRs can be accessed via a mobile device. Support is provided for the iPhone/iPad, Android 2.x and Windows Mobile operating systems. Before the DVR can be accessed by a mobile device it needs to be setup on a network
For iPhone / iPad user, go to the iPhone app store and search for the Matrix Mobile app. Load the app and set up with your DVR IP address.
For Android 2.x, go to Google Play and search for Matrix Mobile. Load the app and set up with your DVR IP address.
For Windows Mobile, there is no need to download an app. The program is supplied on the disk included with the DVR.
Which PTZ protocols are supported by the ADT DVRs?
All current ADT DVRs are capable of controlling Pan/Tilt and Zoom (PTZ) cameras. The DVRs communicate via the RS485 port with about 60 different manufacturer’s protocols including the most common Fastrax, Pelco, Bosch, Hitron, Samsung, Panasonic, and Honeywell models.
RS485 wiring, typically twisted pair, will need to be run from the RS485 connection on the DVR to the PTZ camera. The extent of functionality may vary but will include at least the basic control of Pan, Tilt, and Zoom.
Current Supported Protocols:
AUTODOME (Bosch)
C-CC501 (TOA)
CDC 2500 (Costar)
CDC2400 (Dynacolor)
CRD-J6416 (Chilsung)
CRR-1660s (Fine)
CRX-1401 (ERAESEEDS)
D-Protocol (Pelco)
Dennard2060 (Dennard)
DMP-1223 (Tokina)
CRX-500 (Dongyang Unitech)
DY-255RXC (Dongyang)
Delta Dome II/Ultra IV (Sensormatic)
Fastrax (Hitron)
Fastrax2 (Hitron)
Fastrax-IIE (Hitron)
G3 Basic AutoDome (Phillips)
GRU604A (LG Honeywell)
HDC-655 (Honeywell)
HSD-25X (LG Honeywell)
HSDN-251 (Honeywell)
IRX-100 (IDIS)
KD6 (Ultrak)
KD6-Z Series (Ultrak)
KTD-312 (Kalatel)
LG Speed Dome
LPT-A100L (LG)
NIKO (New Born Hightech)
N-Control (NOVUS)
NOVUS-C
MRX-1000 (Samsung)
Orbiter Microsphere (Ademco Video)
ORX_1000 (SysMania)
PIH-717 (Linlin)
PTC-200C/CVAS (ELMO)
PTC-250C (ELMO)
PTC-400 (ELMO)
PTC-1000 (ELMO)
Pacom 2036 (Pacom)
Power Controller (Dongyang)
Receiver/MPU (Sungjin)
SIV722V (Costar)
SPD 1600 (Samsung Techwin)
Samsung Dome (Samsung)
Spectra Dome (Pelco)
SRX-100B (Samsung Techwin)
SpeedDome (Hitron)
TK-S536 (JVC)
Solaris
Ultra VI (Sensormatic)
VC-C4 (Canon)
VC-C50i (Canon)
VRX-2201 (Inter-M)
Vicon (Vicon)
22x AF Zoom (Hitron)
VisionDome (360Vision)
WJ-SX550J (Panasonic)
WV-CS850/854 (Panasonic)
ZC-SD622J (CBC)
Zoom Camera (Samsung)
What would cause my DVR to go into alarm or beep?
Digital Recorders can go into alarm for several reasons:
- Motion Detection
- Text-In
- Check Recording
- Check Alarm-In
- Disk Bad
- Disk Almost Full
- Video Loss
- Disk S.M.A.R.T.
- Disk Temperature
- Video Blind
- Disk Config Change
- Disk Full
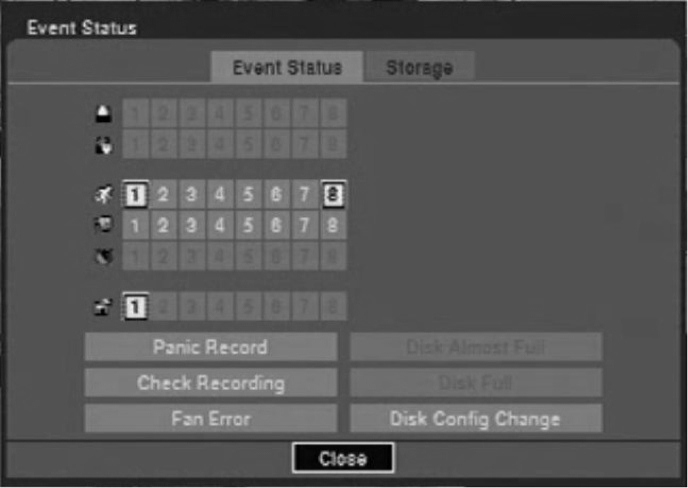
To determine the specific reason why your DVR is alarming, access the DVR setup menu and go to the Event Status screen.
The cause of the alarm will be highlighted (yellow) and flashing on the screen. The DVR will be alarming as a result of a detected event based on its settings.
Alarm Reset
On the front panel of the DVR there is an ALARM button. The ALARM button has two functions:
- It will reset the current alarm, and if the DVR is beeping, it will silence.
- It will display the event log (if you press and hold the button for more than three seconds).
This operation could be password protected.